
You Won’t Believe What They Found in this Tabletop!!
XaParticle board, sweat, hard work and dedication.
Have you ever wondered how your desktop was made or maybe what goes in to making one? Even if you haven’t, here’s how it’s done.
At Regency, some desks and tabletops are made in what we call The Top Shop™. There, Jason and Jose are responsible for the design, assembly, and manufacturing of tabletops; like everyone working here, their job is important to the flow of the well-oiled machine that is our company. They make tabletops and custom-made furniture from scratch for customers and as a backup supplier.
The workload fluctuates based on orders and other tasks, so there isn’t a “typical day” in the Top Shop. One day Jose could spend his whole time designing a custom ordered desk while the next he and Jason are mass producing tabletops. Sometimes switching between laminate finishes, dimensions, shapes, and styles is necessary.
Making custom tabletops and some of our standard tops are relatively similar but differ slightly in process and number of steps to complete.
Starting with the easier one; standard tops.
It all starts in the design software where dimensions are specified that usually range from 42in x 24in to 84in x 24in but can vary depending on the top that is being made.

The machine that cuts the wood runs files of the design and dimensions and begins cutting the wood. Unfortunately, it is also the longest, loudest, and most boring aspect of what Jason and Jose do.
After that, they get to move on to the more exciting parts.
Next is cutting a slot in the wood to allow for an edging to be inserted. T-Mold, the edging, covers the sides of the wood to round out corners and prevent you from getting scratched or a splinter.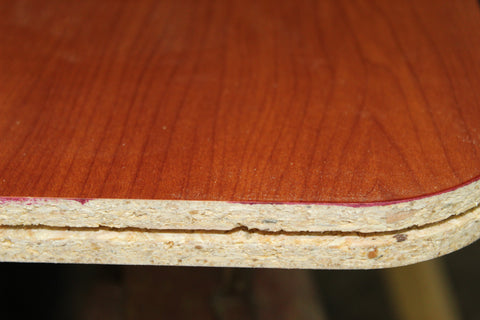
However, before the T-Mold is added, the edges are sanded to prevent chipping of the finish.

The T-Mold is then hammered into the slot and trimmed down to fit perfectly on the top, bottom and sides.

After trimming, the tabletop is polished and ready to be shipped out or assembled to something else. In some cases, holes need to be drilled in the tabletop for products that require that type of assembly.

This process sounds easy enough when broken down like that and to the two boys working there, it is but to an outsider this job is mildly dangerous and there is plenty of room for error.
To see other tables, click here.
Now the more complex process; custom tabletops.
This starts like the other, however it does not use preset, easy dimensions and can require math on occasions, especially if you are making a half circle table that is divided into three separate pieces. In this design process there are more things to consider in addition to dimensions and finish, such as shipping, style, and parts locations.
Once it’s designed, the wood is cut,  next step would be to add the slot depending on the style, some styles might have edge banding that requires glue instead of the T-Mold.
Before adding the edge banding, the wood must be sanded, just like with standard tabletops.

Jose has ways of blocking the glue from spraying on to the whole table, but it is nothing fancy, just using other pieces of wood to block it. Simple but effective.
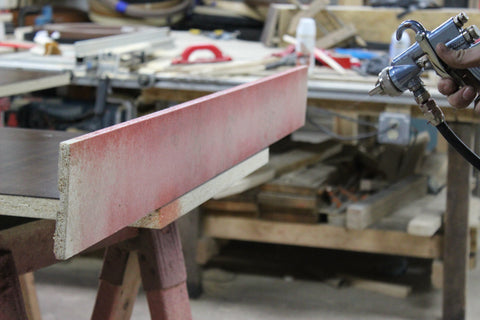
After the glue is added, they must wait about 5 minutes before applying the edge banding since it is made with ethanol, they need to wait for that to evaporate or else the banding will slide off or go in an odd position. The wait isn’t too bad especially since they usually have a rotation of tasks to do.

The remainder of the process is the same as the others, trimming the banding and a final polishing.
If a mistake is made, they could have to restart. Sometime the wood needs to be reordered anytime there is a mistake which is a 3 day wait and revisions to the cutting process to try to get it right the next time.
Overall, it may seem boring and not something anyone wants to do but the guys in the Top Shop are passionate about woodworking and their jobs. It isn’t a mind-numbingly dull task for them either, with the designing and attention to detail that is required for quality tabletops. It is a lot of work but for Jose and Jason, it’s fun work in a relaxed environment and good company.
These types of tables are perfect for classrooms, conference rooms, dining areas, breakrooms, you name it. We provide different tables and tabletops for whatever your needs are and we are happy to share the process of making them. :)
Be sure to follow us and leave a comment on what you would like to learn about next!
TOP facebook: @OfficePlaceAkron
TOP Instagram: the_officeplace